|
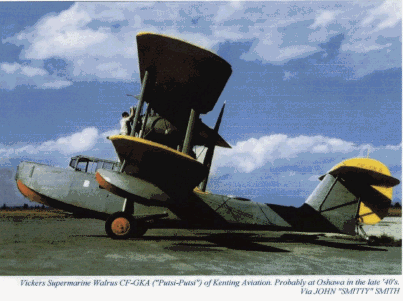
There are very few options for finishing the Walrus, its either WW2
camouflage or nothing…Oh Yah! During the late 1940s, Kenting Aviation, a
photo-survey company, utilized a Walrus MkII on the Labrador coast and
because I like doing odd-ball models, this looked like a natural for me. The
following photo is not one of my digital fun things but the rear cover from
the Canadian Aviation Historical Society magazine. |
 |
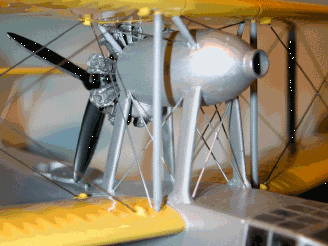
The Kit The kit is very well cast in
grey styrene with plenty of small resin parts to really get your blood
pressure up. And a riggers nightmare! For the most part the kit went
together with few problems…until I tried gluing up the engine nacelle and
the eight struts that hold the nacelle and centre section of the upper wing.
My kit nacelle did not have any locating marks on it for the struts and
of course there were no locating pins on any of the struts. After studying a
few photographs of the Walrus, I eventually glued the struts to the nacelle
then while the joints were still soft, I glued the struts to the fuselage
top, twisting things to get the correct angles.
|
| With that
bit of frustration over, I glued the lower wing, horizontal tail and rudder
in place…the upper wing was assembled but left off for painting. The
nacelle to fuselage rigging was installed using fine steel wire inserted
into pre-drilled holes One very time consuming bit of work was cleaning up
the small resin tear-drop shaped fairings for the wing rigging, sixteen in
all. And each one the size of a gnats eyeball.
|
 |
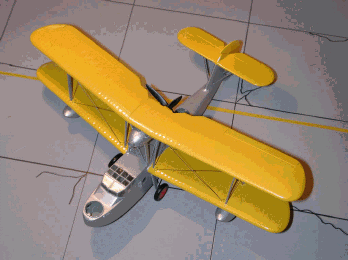 |
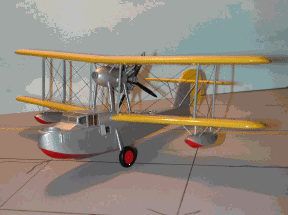
Painting
There were at least two versions of this paint scheme but I chose the one
in the header photo. The wings and tail were painted with Polly Scale Deep
Japan Yellow then given a gloss coat of Polly Scale Clear.
The fuselage colour was in question, grey or dull aluminum dope…As I had
seen in a number of post WW2 aircraft, aluminum dope was the quick and easy
way of covering the hull which was wood with fabric covering. I mixed Polly
Scale Medium Sea Grey and Dull Aluminum until it looked close. The yellow
areas were then masked and the fuselage was sprayed with the mixture.
The bottom of the hull, wing tip floats and wheel hubs were painted with
Model Master Acrylic Guards Red lightened with a bit of yellow.
The wheels were painted with a dark grey Polly Scale mixture of Ocean
Grey and Black. |
|
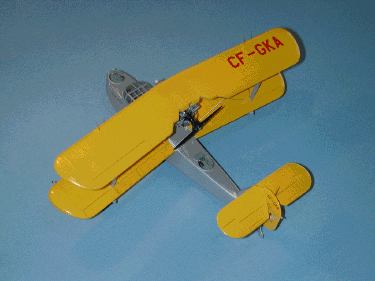
Final Assembly With the model painted,
it was time to get at the upper wing, wing tip floats and undercarriage. The
fuselage was jigged up in a small vise, then the interplane struts were
installed and while the glue was setting up, I glued the top wing in place
and ensured that it was properly aligned with the lower wing. The centre
section upper struts were then glued in place, as close as I could get them
keeping in mind there were no locating marks.
|
 |
 |
The wing
tip floats were installed and it was time to tackle the rigging.
Pre-drilling made the job a lot easier and the steel wire was much easier to
handle than stretched sprue.
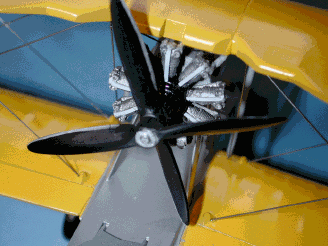
The engine and prop were finished and attached to the nacelle and the
landing gear was installed at the same time. Because of the lack of locator
marks on the nacelle, the engine did not fit quite right but that is one of
the problems with limited run kits.
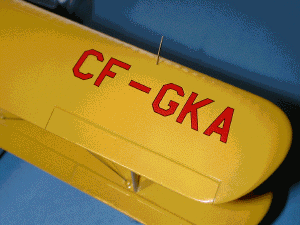
I added the rear hatch cover, bird cage canopy and a few other bits and
then it was time to decal the beast. I was going to try using Bare Metal
Decal Paper in my Epson Inkjet printer but then all that work was taken over
by Gordon Parker of Whiskeyjack Decals. |
|
Decals Gordon Parker has been
producing Whiskeyjack decals for some time and his specialty is Canadian
airlines and "bush" operators. I visited his home/office in Chilliwack, BC
to get a close-up look at his product line. Gord does all of the artwork
using Coreldraw and the printing is done on an Alps printer.
The decals for the Walrus are part of a sheet of other Kenting Aviation
aircraft which include a very colourful B-17 and the Sea Hornet, all of
which were used for airbourne photography of Northern Canada after WW2. |
 |
 |
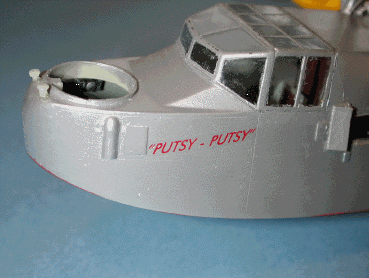
As can be
seen in the above photos, the markings are very sharp with a thin black
outline. With the Alps printed decals you have to be very careful in
handling, and with that in mind I coated the markings with a brushed coat of
MicroScale Decal Film. Using Testors Decal Setting Solution, the decals were
slipped into place and when dry, the clear carrier was virtually invisible.
The quality of the artwork and printing is extremely good and if you are
interested in Canadian civil models, then I can recommend Whiskeyjack
decals. Gord Parker can be reached at
gorlem@shaw.ca .
|
 |
 |
|
Conclusion The Walrus served with
distinction during WW2 as an Air/Sea Rescue aircraft both in Europe and in
Canada. After the war, those that were still serviceable were put to use as
can be seen here.
The kit has some short-comings but nothing that a bit of modelling skills
and patience can’t overcome to get a good looking model.
The Whiskeyjack Decals were of very high quality and a product that you
might want to have a look at. |