 |
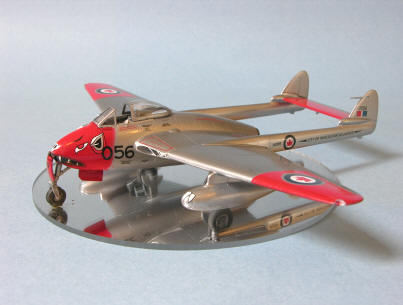
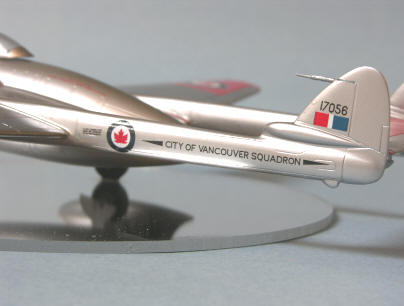
With the
introduction of jet aircraft into the Royal Canadian Air Force, The City
of Vancouver Squadron operated the DH Vampire Mk3 from April 1948 until
October 1956 in a Fighter Auxiliary role. The squadrons wartime
crest featured a Nootka Indian Dragon and it was only fitting that with
the introduction of the Vampire, a suitable design was required to
emblazon the nose of this diminutive fighter.
The Haida Vampire face was designed and applied and no two faces were
the same. |
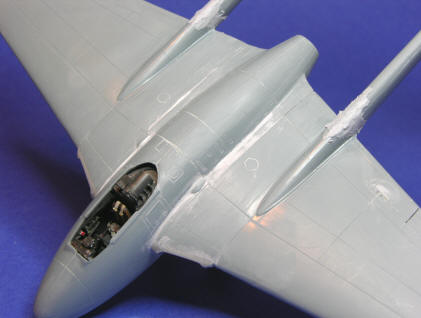
| This rendition of
the squadrons Vampire is from the 1:48 scale Classic Airframes Mk5 kit
which includes the rounded Mk3 wingtips. The decals were obtained
from Flightdecs Decals after Joe went out of his way to find the
original Arrow Graphics sheet. The kit is a mix of injected plastic
and resin with a beautifully detailed cockpit which is virtually
invisible once the fuselage is closed up. Some difficulty was
experienced in fitting the wing to the fuselage because of the resin jet
intakes. Some plastic sheet shims were required to fill the gaps
at the wing roots. |
 |
 |
Fitting the tail
booms required a simple jig in order to line up the fuselage tail booms
and horizontal tail and quite a bit of Tamiya putty was used to fill the
minor gaps as can be seen in the photo below. Prior to closing up the
fuselage sides, I glued as much lead into the nose section as possible
in an attempt to have the Vampire sit on all three wheels...but to no
avail. It was a "tail-sitter". Fortunately I had a
plexiglas mirror which served as a base and the model became permanently
glued to it. |
| The RCAF Vampires
were painted overall with Aluminum coloured nitrate dope and to simulate
the proper finish, I first sprayed the model with Alclad II Grey primer
followed by a buffing with an old cotton sock to give a smooth base.
Next came spraying the wing tips, horizontal stabilizer and nose with
Model Master "Guards Red" enamel. When dry these areas were masked
and three coats of Alclad II Duraluminum was sprayed. The decals were
applied directly to the Alclad finish without a problem. Thanks
again Joe for going beyond the norm to help me with this model. |
 |