![]()
![]()


|
|
|
|
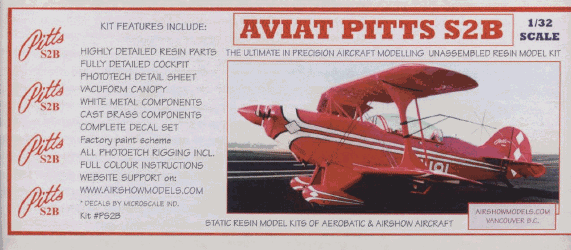
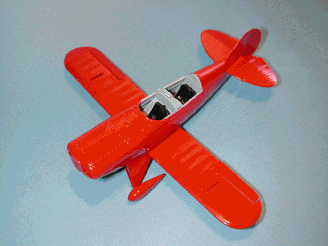
Pitts S2B 1/32 Scale Resin Kit by AirshowModels.com The Pitts S2B kit by Airshow Models.Com is the second in a series of aerobatic aircraft by this new company. The S2B is a certified production aerobatic trainer and display aircraft produced by Aviat Aircraft of Afton, Wyoming. This aircraft is a descendant of the original Pitts Special designed in the late 1940s by Curtis Pitts.
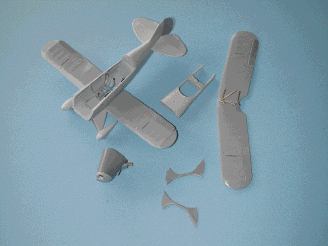
The Kit The latest kit by Airshow Models.com of Surrey, British Columbia, Canada, is a 1/32 scale cast resin replica of the Aviat S2B. The resin detailing is beautifully executed with the smallest switches in the cockpit cleanly moulded. The upper fuselage fairing is cast separately to allow detailing of the cockpit area. The instrument panels and fuel tank are cast into the fairing.
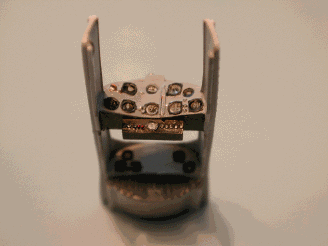
The cowling has the front cylinders of the Lycoming engine cast into the front end. Over this is the cowling nose bowl which allows for a more detailed nose section. The rest of the resin parts include; wings, landing gear, tail and interplane struts as well as separate ailerons and throttle quadrants. The kit has finely cast brass cabane struts, landing gear axle struts, tail wheel and control columns. Also included is a photo-etch fret that allows the modeller to add much more detail to the cockpit and exterior. This includes landing and flying wires, tail brace wires, safety harnesses (also a number of brass buckles for those who want to make up their own harnesses), heal scuff plates, aileron spades and aerobatic sight device. Two vacu-formed canopies are included…just in case. The propeller and spinner in the pre-production kit was of white metal but a resin unit will be available. Construction I started construction by soldering the forward cabane struts together. These are aligned by small pins and holes cast into the struts. Superglue will work here but I wanted extra strength. I also soldered the two control columns to the aileron torque tube for the same reason. Next the pour stubs were removed using a fine toothed razor saw and the resin
parts cleaned up with 400 grit wet sandpaper. All parts were washed in warm
water using liquid dish soap and an old toothbrush. The lower wing was then
epoxied to the fuselage along with the main gear undercarriage legs, wheels and
horizontal tail plane.
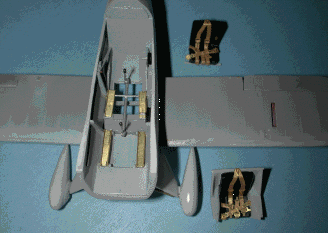
The aileron torque tube assembly, heal scuff plates, throttle quadrants and fuel pump handle were installed in the cockpits. The seats were then detailed using the photo-etched seat belts, painted and installed. The rear seat throttle quadrant and fuel pump have a structural member attached which is inserted into a hole at the base of the cockpit. There are locating pins on the rear seat which go into recesses in the lower framework.
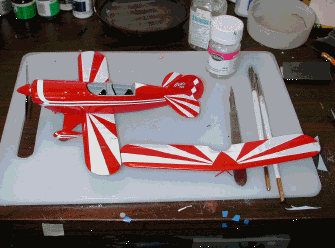
The instrument panels were then painted and detailed with instrument decals from an old Airwaves sheet. Don’t forget that little magneto switch on the left side of the panel! The upper fuselage fairing was then epoxied to the fuselage and the excess glue removed using a Q-Tip and denatured alcohol. The cowling was epoxied in place and the engine cylinders painted prior to installing the cowling nose bowl. The carburetor intake, cowl gill and rudder were next installed and the model was ready for painting. The cabane struts were glued in place on the upper wing along with the ailerons in both wings. Liquid mask by MicroScale was used in the cabane strut holes in the fuselage and the interplane strut slots in the wings. The nose bowl, cockpit and bottom of the fuselage were stuffed with damp tissue and the entire model was sprayed with a light grey primer.
The model was then painted Model Master Guards Red which is fairly close to the Randolph Paints Tennessee Red. When the model was thoroughly dry, I removed the tissue from all of the cavities and awaited the delivery of the decals. As this was a preproduction kit, parts arrived as they became available but the wait was worthwhile. Pete Groves, the mastermind behind Airshow Models.com is a B747 pilot when he isn’t producing these kits and parts delivery will on occasion have to wait until his schedule permits.
Decals
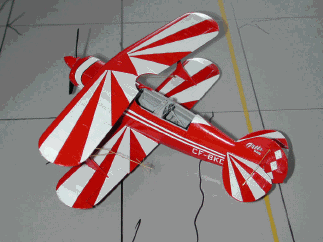
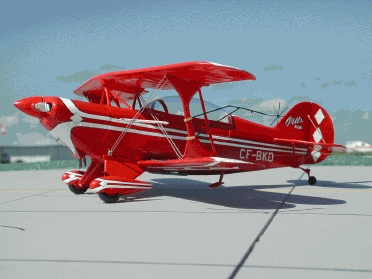
The decals in this kit are printed by MicroScale and are double printed to avoid having the red bleed through. Because of the thickness of the ink, it is important to use warm water to loosen the decal from the backing paper...I found out the hard way! The decals layout very well with only a bit of careful trimming around the carb air intake and cowl gill. I used a ½ inch soft brush to apply the decals with only one split in the fuselage stripe. Other then that, there were no major problems with the application. I did use Solvaset to make the decals adhere to the cowling details. Final Assembly The interplane struts were epoxied into the slots in the lower wing and then the upper wing was installed before the epoxy had set up, giving a perfectly aligned model. The use of epoxy allows for the extra strength required in handling a resin biplane. The photo-etch landing wires, parts A and B were installed using superglue with the small end at the cabane strut fairing and the large end in the recess in the lower wing. The flying wires, parts C and D were installed with the small end in the slot in the top end of the landing gear leg and the large end in the recess in the bottom of the upper wing.
The aileron "Spades", PE part #1 were added to the bottom of the lower ailerons (omit PE part #2..use the supplied piece of airfoil shaped plastic strut material). The upper tail brace wires PE 4 and lower brace wires PE 5 were glued in place. At this point I glued the aileron slave struts into place to avoid breaking the sighting devise, PE 6. This latter part has slightly enlarged tabs on the ends of the mounting arms and these should be bent at the middle of the tab so that they can be wrapped around the left interplane strut. I glued the sighting device to the strut with superglue then used tweezers to pinch the tabs around the strut. The pitot tube supplied with the kit ended up in the jaws of the thing under my desk, so a piece of hypodermic needle was installed on the lower left wing. The propeller/spinner were finished and installed, and all that is left is the canopy which will be in the closed position. The canopy PE parts 8 and 9 are installed on the inside edge of the canopy with the slanted end forward, aligning with the rear edge of the canopy bow frame. If properly installed the rectangular cut-out will fit the canopy support and virtually lock in place. Javelin struts between the flying and landing wires are supplied with this kit in the form of small diameter plastic rod. Conclusion: This kit was as mentioned, a preproduction kit which I had to put together to prove Pete’s ideas and be able to come up with a construction manual for the production models. It went together in about 12 hours and it proved to be quite an easy build. There was very little flash on any of the parts and the removal of the pour stubs was not difficult.
The mouldings have a slightly rough texture to them but a bit of wet sanding with 400 grit paper will provide a very slick surface. All components fit beautifully without any modification and by taking the time to carefully assemble and paint this model, you will come up with something really spectacular. And it will stand out along side the other models in this series. Article and photos by: Barney Dunlevy Recommended for all modelers
|
|