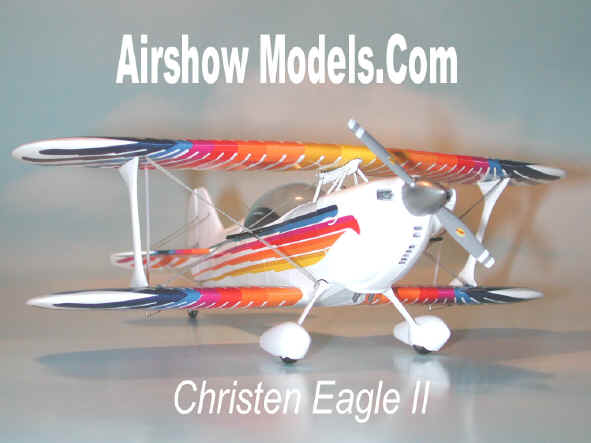
AirShow Models Christen Eagle II
Kit Review
When I heard about Peter Groves’ new Eagle kit, I was eager to see what he had come up with and when we met for lunch, I was very impressed with what I saw. Peter had asked me to do a construction article on the Eagle and to do a photo shoot outside of his old hangar at Delta Air Park...how could I say no!
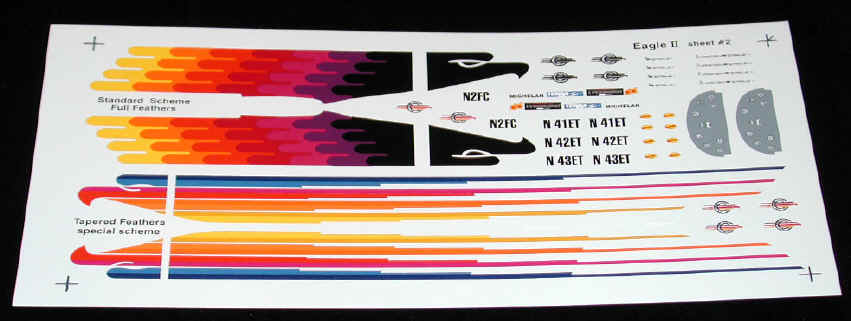
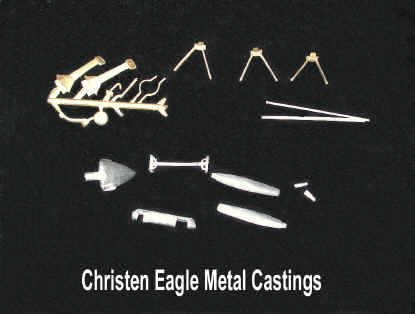
He provided me with a kit, which contained some very good looking castings in brass, white metal, and resin. The decals, which make the Eagle an outstanding subject, cover most of the aircraft so painting would be at a minimum; White airframe, black tires and a simple but detailed interior.
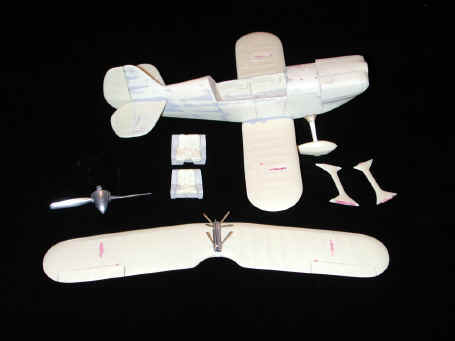
| The fuselage consists of one casting with very fine scribed panel lines and slightly raised stringers, with a deep cockpit. The cowling is cast as a one piece unit with a fairly large casting plug on the back. This was the biggest bit of resin that had to be sawn off with a fine-tooth saw. The upper and lower wings are both one piece with alignment slots for the struts. The rudder and horizontal tail components are scale thickness with all flying surfaces having nicely detailed ribbing. |  |
 |
The
landing gear consists of brass gear legs, which fit perfectly into slots
on the fuselage ahead of the wings, and wheel pants with treaded tires
molded in, which are also slotted for the lower gear legs. The tail wheel
is a jewel of a brass casting with a small lug, to be inserted into a slot
in the lower fuselage.
Initial trial fitting of the components indicated few if any problems. Because of the size and weight of the major parts, I would recommend that 5 Minute Epoxy be used as an adhesive; particularly the engine cowling and lower wing. The epoxy will give you time to align the parts for a more accurate fit and if you have any excess squeeze out it can be removed with rubbing alcohol on a Q-tip...making a better fillet at the joint. The cabane struts, three brass V-units which are numbered (with No1 to the front), fit into a slot in the bottom side of the upper wing, then covered with a white metal fairing which makes up the center section of the strut system. |
|
The spinner and propeller blades are cast white metal with very good detailing on the spinner. The two exhaust stacks are also cast in white metal. The cockpit consists of two seats with cast-in safety harness, an instrument panel for the front seat, two throttle quadrants and two canopy locking panels. There are also two brass control columns and a couple of canopy handles and cross member for the canopy. This last item is vacu-formed with a spare...just in case. |
|
ConstructionFor a large number of resin castings, there are very few pinholes...only 7 in my copy. The resin components were sanded to clean up a bit of flashing then the lower wings and horizontal tail, were epoxied in place along with the main gear legs and tail wheel. The lower wing –to fuselage joint required a piece of .010 plastic card to fill the gap. After the glue cured it was easy to trim the excess plastic with a new scalpel blade. The engine cowling was then epoxied in place and then sanded to finish the installation. The main gear wheel pants was glued in place with epoxy and the trailing edges of the wheel pants were blocked up with 1/8 inch balsa strip to ensure proper alignment with the model sitting on its wheels.
|
 |
| The lower wing was marked
for the landing wires and these were pre-drilled as were the landing gear
fairings, to ensure that the photo etched steel wires would be installed
without sagging. The I-struts were temporarily installed into the slotted
wing surfaces then traced around the base with a scribing tool. This was
to ensure that when painted and decaled, this area could be removed for
the final assembly of the upper wing and struts, providing a good bonding
surface.
The model was given a coat of Mr. Surfacer and a final light sanding in preparation for painting.
|
|
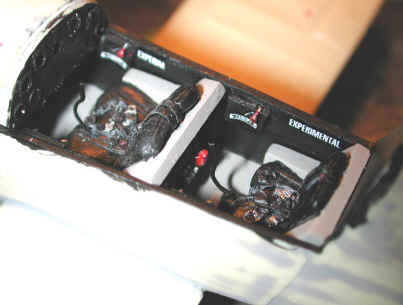 |
The canopy was cut free and carefully sanded to fit the cockpit, then the white metal cross piece was attached to the canopy. The cockpit was then detailed with the instrument panel, throttle quadrants and canopy handles. The seats were painted as per C-FPNB, Peter’s old aircraft. With all the pieces in the cockpit, the canopy was masked using fine tape and Micro Scale liquid mask. When this dried the canopy was glued over the cockpit with MS Krystal Kleer.
|
| The propeller blades and
spinner are cast in White Metal with good details. These were polished
using Autosol Chrome polish. The blades were then painted Flat Black on
the rear surface and Flat Medium Grey on the front.
With the paint dried, the blades were inserted into the spinner with super glue. The blades were given a light brushed coat of Polly Scale Gloss Clear and the decals applied, followed by a flat coat to seal and finish the blades. |
|
| With the canopy now installed it was time to get on with painting. Polly Scale Flat White was used as both a primer and final colour coat followed by three light coats of Polly Scale Clear Gloss. This was completed prior to installing the upper wing and the flying and landing wires. Now the moment I’ve been waiting for...those beautiful big decals. But the devil struck big time…the Polly scale reacted with the resin, presumably, causing big yellowish spots. The acrylic paint was quickly removed with Windex and the model was given two light coats of Floquil White Enamel Primer, followed by three light coats of Model Master Gloss White enamel. | 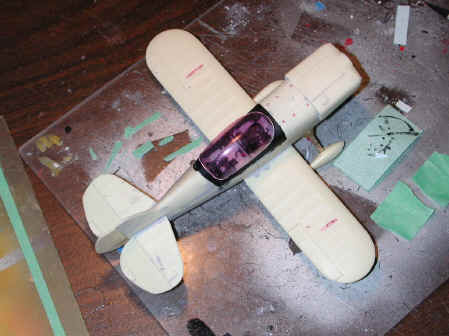 |
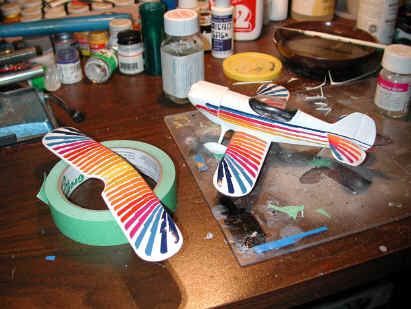 |
The decals were then applied starting with the bottom side of the stabilizer and upper and lower wings. These went down without a problem and due to the thickness of the inks, a coat of Solvaset was applied and the wait was on. The upper surface decals were now applied, being careful to align the colours at the leading edge. The fuselage now received the decals, with a cutout for the horizontal tail. Aircraft registration letters were made up from clear decal paper and Letraset rub-down letters and applied to the rudder and underside of the left wing. Not surprising, the Eagle is registered C-FPNB, Peter Groves’ old Eagle II which is based at Boundary Bay, my home airport. |
| With the decals finished, it was time for final assembly. Remove the decal film from the wing strut mounting slots and test fit the cabane struts and the interwing struts. The brass and white metal pieces in the cabanes took a lot of fitting and filing and when I was satisfied , I drilled out the six holes on top of the forward fuselage and attached the struts and fairing. The upper wing was laid flat and 5 minute epoxy was applied to the groove in the bottom of the upper wing and the slots for the I-struts. The fuselage was inverted and the struts were inserted in the slots. Take care here because the I-struts are beveled both top and bottom and can only fit properly in one way. The model is designed to be self- aligning and sure enough when the epoxy cured the Eagle was perfectly set up. | 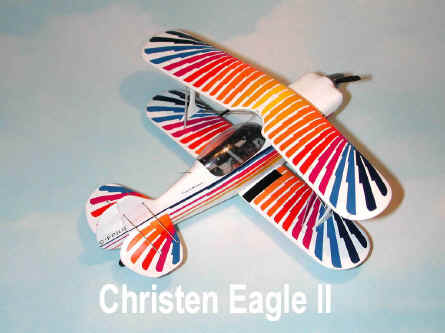 |
The photo-etched brace wires were next. I had pre-drilled the attach points and the wires just dropped into place and secured with super glue. The aileron and rudder fittings were next glued in place with super glue and the tail wheel springs were installed…my only add-on to a completely satisfying model.
The construction of this kit, along with the article and photographs are by
B.K.(Barney) Dunlevy
14093-16 Ave
Surrey, B.C.
Canada
About the author: I am the oldest active tower controller in North America at 66 years young. I joined the Royal Canadian Air Force in 1953 as an Air Traffic Assistant, the year after I started pilot training. Retiring in 1976 as Chief Tower Controller at Moose Jaw, home of the famous "Snowbirds", I ran a flying school for a few years then joined Transport Canada as a Tower Controller in 1980. I had been building models of all types until 1970 but then got the bug again in 1981 at which time I really got into plastic models.
I am still active as both a controller and Commercial pilot/flight instructor with over 85 different types of aircraft in my log book.
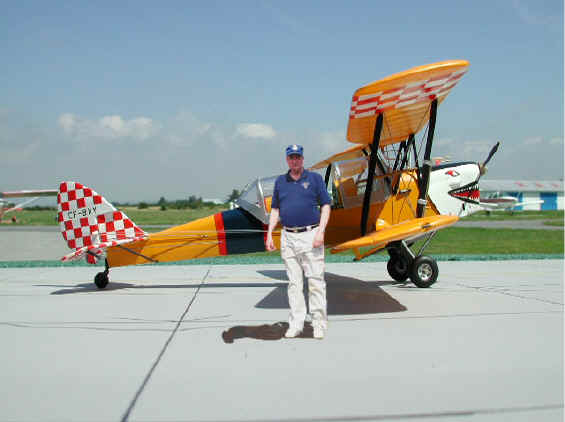
The model is a greatly modified 1/32 scale Matchbox DH82C Tiger Moth. The old guy is 1/1 scale with a little digital nonsense.